How to take a soil sample
There are three different scenarios from which to take a soil sample: soil, compost, and liquid amendment. Here is a small guide to walk you through the steps.
Regular soil sample
Choose the plant you care about. Look at the plant, and determine how far out from the stem the leaves and branches of the plant spread out. The farthest that reaches is called the dripline. It may be zero (such as in grasses) or twenty feet (trees). Now, imagine a ring around your plant halfway between the stem and the dripline. That is the zone from which you sample.
- Using your apple corer, take three 3″ deep samples at different areas around your plant. Place each of these cylinders of dirt into a regular sandwich baggie.
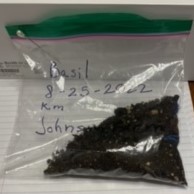
- Write (with a permanent marker) on the outside of your baggie 1) the plant, 2) the date, 3) the field or property or owner, and 4) the initials of the person doing the sampling. Do not put paper with this information inside the baggie. It will be consumed by microbes.
- Make sure your baggie is only a fourth or a third full. You can also pierce the top of the bag with a pin several times to assure air flow.
- Seal your bag, add any other samples you might be taking, and mail it either overnight or with a maximum of two days in transit. The longer it takes for your bag to reach the lab, the less accurate the biological soil assessment will be. The creatures inside the bag will begin to consume each other, skewing the results.
- If your field is all the same, either bare or homogenous, then divide it into sections, and randomly pick sections from which to draw cores. Five is a good number of sections. Just go to the center of the section, brush away any leaf litter, and use the corer to collect at least three inches of soil. Add all five cores to the same baggie.
Compost sample
With compost, use a teaspoon or lab scoop to take samples from different areas of the compost. If you are taking samples from a small compost pile or even a bag of compost from somewhere, then take at least five samples. If it is a large windrow of compost, increase the samples to at least twenty. Try to take samples from the top, the bottom, different sides, and further inside, not just the outside of your compost. Also approximately 1/4 cup of compost is the right amount to submit as a sample.
- Place your collected compost samples inside your baggie.
- Write (with a permanent marker) on the outside of your baggie 1) compost, 2) the date, 3) the property or owner, and 4) the initials of the person doing the sampling. Do not put paper with this information inside the baggie. It will be consumed by microbes.
- Make sure your baggie is only a fourth or a third full. You can also pierce the top of the bag with a pin several times to assure air flow.
- Seal your bag, add any other samples you might be taking, and mail it either overnight or with a maximum of two days in transit. The longer it takes for your bag to reach the lab, the less accurate the biological soil assessment will be. The creatures inside the bag will begin to consume each other, skewing the results.
Liquid amendment sample (compost extract or tea)
- Liquid samples should be placed into a clean plastic bottle.
- It should be filled no more than 1/3 full to make sure there is enough oxygen for the microorganisms.
- The lid should be tightly shut, and duct tape applied around the cap to prevent leakage.
- Permanent marker should be used on the outside of the bottle to note 1) amendment type, 2) the date, 3) the owner.
- The bottle should then be placed in a closed bag or box and overnighted to the lab. The levels of creatures in the liquid will change quickly depending on the level of resources such as oxygen and food over time.
Here to help
If you have any questions at all about taking a soil sample, please email us at [email protected] or call (512) 415-2897 to speak to our Certified Lab Technician Bridget.
We can walk you through whether you want to send in just one sample or if you have a whole farm’s worth of samples you need to take. It does get more complex if you have multiple crops or if you are trying to diagnose an issue.